API Tools
This guide walks you through creating an API tool that your AI agents can use to interact with external systems.
What are API Tools?
API Tools allow your AI agent to connect to external systems and perform actions on behalf of customers:
- Lookups: Check order status, view account balance, find product availability
- Actions: Create orders, update customer info, trigger workflows
- Integrations: Connect to CRMs, ERPs, payment systems, shipping APIs
When a customer asks something that requires external data, the AI agent automatically calls the configured API tool, gets the response, and uses that information to reply.
Accessing API Tools
- Go to Integrations in the sidebar
- Click APIs — this opens the My APIs page
- Click Create New API to create a new tool
Form Sections
Basic Information
| Field | Description | Requirements |
|---|---|---|
| Tool Title | Internal name for the tool (shown to AI) | 3-55 characters, starts with letter, alphanumeric + underscores only |
| Description | Explains what this tool does — the AI uses this to decide when to call it | 10-5000 characters |
Examples of good tool titles:
get_order_statuscreate_support_ticketcheck_inventory
Tip: Write the description as if explaining to a human assistant when they should use this tool.
Good description:
"Retrieves order details including status, items, and shipping info by order ID. Use when customer asks about their order status, tracking, or delivery."
Too vague:
"Get order info"
API Configuration
| Field | Description | Example |
|---|---|---|
| Base URL | The root URL of the API (must be public HTTPS/HTTP) | https://api.yourcrm.com |
| Method | HTTP method: GET, POST, PUT, DELETE | GET for fetching, POST for creating |
| Endpoint Template | The API path (can include variables) | /orders/{{order_id}} |
Important: Base URL must be publicly accessible. Private IPs (192.168.x.x, 10.x.x.x), localhost, and 127.0.0.1 are not allowed.
Domain Whitelisting
Agent calls only go out to approved domains. If your Base URL's domain isn't whitelisted yet, the form shows a warning with a Request review button — submit the domain (with an optional reason) and an Orki admin approves or rejects it. You can track your requests under Settings → Domain Whitelist.
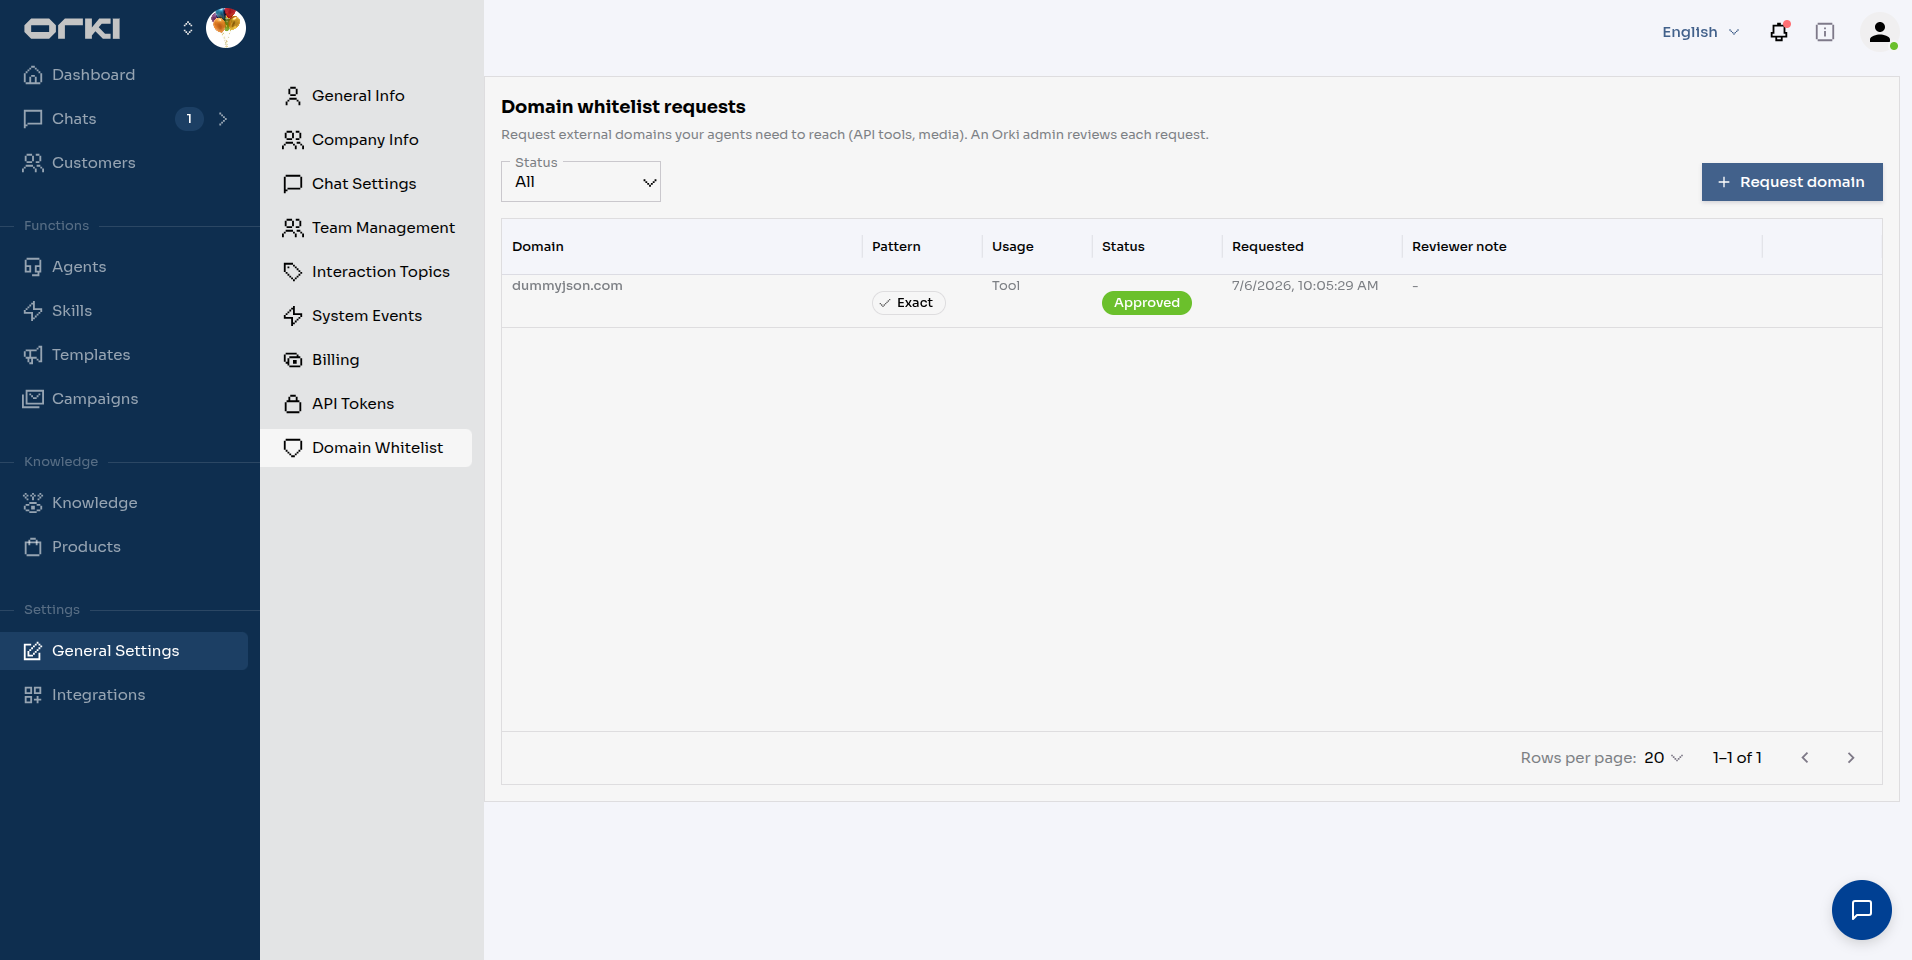
You can save and configure the tool while the request is pending, but live calls to the domain will fail until it's approved.
Variables — Just Like Postman!
Variables work exactly like Postman environment variables. Use double curly braces {{variable_name}} to insert dynamic values.
Two Types of Variables
1. Components — Custom variables extracted from conversation
Syntax: {{component_name}}
Examples: {{order_id}}, {{product_sku}}, {{search_query}}
The AI agent extracts these values from customer messages. For example, when a customer says "What's the status of order #12345?", the AI extracts 12345 as the order_id component.
2. User Attributes — Pre-filled from customer profile
Syntax: {{$attribute_name}}
Available: {{$name}}, {{$email}}, {{$phone}}, {{$location}}, {{$language}}, {{$whatsapp_number}}, {{$whatsapp_name}}, {{$instagram_username}}
These are automatically filled from the customer's profile data.
Where Can You Use Variables?
| Location | Example |
|---|---|
| Endpoint | /users/{{user_id}}/orders |
| Query Parameters | email={{$email}}&status={{order_status}} |
| Headers | Authorization: Bearer {{api_token}} |
| Request Body (JSON) | {"customer_id": {{customer_id}}, "email": {{$email}}} |
| Request Body (Form) | name={{$name}}&order={{order_id}} |
Query Parameters
Add URL query parameters as key-value pairs. These are appended to the URL as ?key=value&key2=value2.
| Key | Value | Result |
|---|---|---|
order_id | {{order_id}} | ?order_id=12345 |
email | {{$email}} | [email protected] |
limit | 10 | ?limit=10 (static value) |
Headers
Add custom HTTP headers. Common uses:
| Header | Value | Purpose |
|---|---|---|
Authorization | Bearer {{api_token}} | API authentication |
X-API-Key | {{api_key}} | Alternative auth method |
X-Customer-ID | {{$email}} | Pass customer context |
Content-Type is automatically set based on your body type selection — you cannot manually set it.
Instead of pasting API keys into headers, create a reusable credential under Integrations → Authentication and attach it in the tool's Authentication section — a static API key, an OAuth2 client, or a WS-Security credential for SOAP services. The secret is encrypted, injected server-side on every call, and the AI agent never sees it. See Authentication for API Tools.
Request Body
For POST/PUT methods, you can send data in the request body.
Body Types:
- JSON (
application/json) — Most common for modern APIs - Form URL Encoded (
application/x-www-form-urlencoded) — Traditional form submission - Form Data (
multipart/form-data) — Key/value fields sent as a multipart body - XML / SOAP (
text/xml) — Legacy SOAP services and XML APIs
JSON Body Example:
{
  "customer_email": {{$email}},
  "customer_name": {{$name}},
  "order_id": {{order_id}},
  "quantity": {{quantity}},
  "notes": {{special_instructions}}
}
Do not wrap a variable in quotes — for any type. Orki substitutes each variable as correctly-typed JSON: text values are quoted for you, numbers and booleans stay unquoted. Adding your own quotes double-quotes the value, and the server rejects it.
- Correct:
"name": {{$name}},"quantity": {{quantity}},"active": {{is_active}} - Wrong:
"name": "{{$name}}"
XML and SOAP Bodies
Choose text/xml (SOAP) and paste the envelope your service expects. Variables work exactly as they do elsewhere:
<soapenv:Envelope xmlns:soapenv="http://schemas.xmlsoap.org/soap/envelope/"
                  xmlns:ord="http://balloonbliss.example/orders">
  <soapenv:Body>
    <ord:GetOrderStatus>
      <ord:OrderId>{{order_id}}</ord:OrderId>
      <ord:CustomerEmail>{{$email}}</ord:CustomerEmail>
    </ord:GetOrderStatus>
  </soapenv:Body>
</soapenv:Envelope>
A live Valid XML / Invalid XML chip tells you whether the template parses as you type.
Anything substituted into a {{placeholder}} is escaped automatically, so an order note containing & or < can't break the envelope. Don't escape values yourself — you'll get double-escaping.
By default the response comes back to the agent as clean JSON rather than raw XML. See Advanced configuration below.
If the service needs a WS-Security UsernameToken, don't hand-write it into the envelope — attach a WS-Security credential under Authentication and Orki inserts the header on every call.
Form Data sends ordinary key/value fields as a multipart body. Sending an actual file — with a filename and content type — is configured through the API rather than this form, and is normally reached from a workflow after a Convert to File step.
JOLT Specification (Optional but Powerful)
What is JOLT?
JOLT (JSON to JSON Transformation Language) transforms the API response into a simpler format before the AI agent receives it.
When to use JOLT:
- The API returns complex nested data that confuses the AI
- You want to extract only specific fields
- You need to rename fields to be more descriptive
- The response is too large and you want to trim it down
Why Use JOLT?
- Cleaner AI responses — The AI works better with simple, flat data
- Reduce token usage — Smaller responses = faster, cheaper AI processing
- Hide sensitive data — Only pass relevant fields to the AI
- Standardize formats — Make different APIs return consistent structures
JOLT Example
API returns:
{
  "data": {
    "order": {
      "id": "ORD-123",
      "customer": {
        "name": "John",
        "contact": { "email": "[email protected]" }
      },
      "status": "shipped",
      "items": [...]
    }
  }
}
JOLT Spec to flatten:
[
  {
    "operation": "shift",
    "spec": {
      "data": {
        "order": {
          "id": "order_id",
          "status": "order_status",
          "customer": {
            "name": "customer_name"
          }
        }
      }
    }
  }
]
Transformed result:
{
  "order_id": "ORD-123",
  "order_status": "shipped",
  "customer_name": "John"
}
Common JOLT Operations:
shift— Move/rename fields (most common)default— Add default values for missing fieldsremove— Delete unwanted fields
Building JOLT with the Test Drawer
You don't need to write JOLT blind. The tool form has a built-in Test drawer that runs the real request against your API and shows the actual response. It includes a JOLT playground where you can iterate on the spec against that live response and apply it to the tool directly once the output looks right.
You can also open AI View (the "What does the AI see?" preview on the tool card) at any time to see the exact schema and description the AI agent receives for your tool.
Renaming for Clarity
JOLT is especially useful for renaming cryptic field names to something the AI understands better:
| Original Field | Renamed To | Why |
|---|---|---|
ord_sts | order_status | Clearer meaning |
cust_nm | customer_name | AI understands "name" |
dlvry_dt | delivery_date | Removes abbreviations |
Response PII
If your API returns personal data — a phone number, a civil ID, an IBAN — tell Orki which fields hold it. Those values are then replaced with placeholders before the AI model sees the response, and are masked in the dashboard for staff below the matching access level.
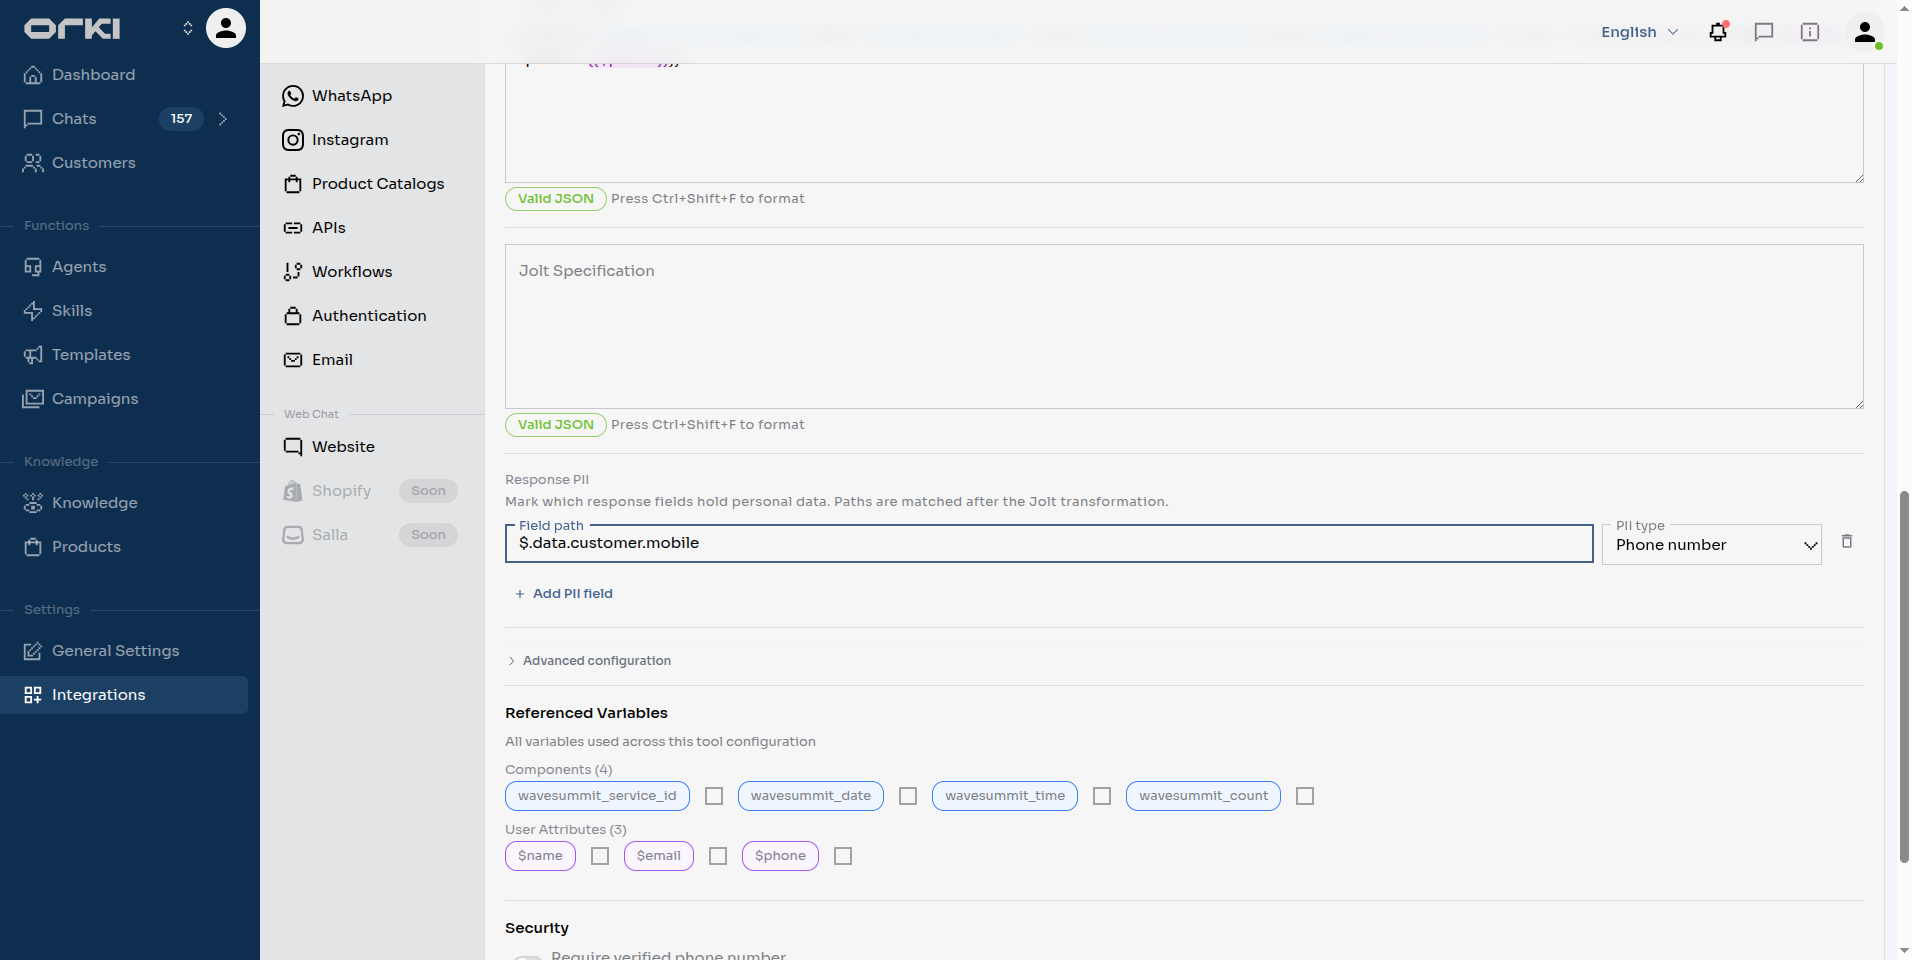
| Field | What to enter |
|---|---|
| Field path | A JSONPath into the response, e.g. $.data.customer.mobile or $.bookings[*].phone |
| PII type | Name, Email, Phone number, Civil ID, CR number, IBAN or Bank account |
Write paths against the response as your JOLT spec leaves it, not the raw upstream shape. If you renamed cust_mobile to phone, declare phone.
Run the tool once with Test before filling this in — the Field path box then offers the real paths from that response as suggestions.
This is deliberately declarative: Orki masks exactly what you declare and nothing else, so an account number that happens to look like a phone number is never mistaken for one.
Response PII only takes effect while personal data masking is switched on for your workspace.
Advanced Configuration
Collapsed by default. Two settings live here.
Convert XML response to JSON
XML/SOAP tools only. On by default. SOAP envelopes are unwrapped, namespaces are stripped, and faults are surfaced as a structured error, so your JOLT spec and the AI agent both work with clean JSON.
Turn it off only if you want the raw XML passed through untouched — "off" doesn't mean "no XML", it means "no conversion".
Verify on timeout
Off by default. For write calls where a timeout leaves you genuinely unsure whether the operation landed — a created ticket, a placed order — this checks before anything is retried.
| Field | What it's for |
|---|---|
| Verify endpoint | A read-only path that can tell you whether the write happened |
| Method | GET or POST |
| Verify query parameters | Resolved with the same variables as the main request |
| Match path (JSONPath) | Where the reference appears in the verify response, e.g. $.tickets[*].reference |
| Expected value | The reference to look for, e.g. {{reference_id}} |
| Retry when not found | Retry the original call if the verify lookup finds nothing |
| Max retries | 0–2 |
Send a unique value — a component like {{reference_id}} — in both the request body and the Expected value field. Without something to match, Orki can't tell your record apart from anyone else's.
If the reference is found, the call is treated as successful and the verify response is used. If not, and retries are enabled, the original request is retried up to the limit. This is what prevents duplicate orders and duplicate tickets.
Referenced Variables Section
This section auto-populates based on variables used in your configuration.
Required Checkbox:
- Checked — If this value is missing, the AI will ask the customer to provide it before calling the API
- Unchecked — The variable is optional; the API will be called even if the value is missing
Color Coding:
- Blue chip — Valid component (exists in your components list)
- Purple chip — Valid user attribute
- Red chip — Invalid reference (component doesn't exist or typo in attribute name)
Security
This section lets you protect sensitive tools by requiring customers to verify their phone number before the tool can be used.
| Field | Description | Default |
|---|---|---|
| Require verified phone number | When enabled, customers must complete OTP verification before this tool executes | Off |
| Verification validity (days) | How long a successful verification remains valid before the customer needs to verify again | 14 days |
When to enable phone verification:
- Tools that perform sensitive actions (e.g., placing orders, making payments)
- Tools that access personal account information
- Tools that modify customer data through external systems
How it works:
- Customer triggers a conversation that needs this tool
- The AI agent automatically sends an OTP code to the customer's phone number
- Customer replies with the code
- The agent verifies the code and proceeds to call the tool
- Subsequent uses within the validity period skip verification
The validity period (1–365 days) resets from each successful verification. See Phone Verification (OTP) for details on how the verification flow works.
This tool changes data
On by default. It tells Orki whether the tool has side effects.
The setting matters in one place: when the AI drafts a suggested reply for a human agent to review, it must not create orders or send messages as a side effect of composing a draft. Tools marked as changing data are excluded from those turns.
Turn it off only for genuinely read-only tools — lookups, availability checks, status queries. A read-only tool can then be used while drafting suggestions, which makes those drafts far more useful.
This has no effect on ordinary conversations — the agent can call the tool as usual either way. It changes only what the AI is allowed to do while drafting a suggestion for a human. See Suggested Replies.
Creating Components
Before using {{component_name}} variables, you need to create the component. Components define what type of data the AI should extract from conversations.
Component Types
| Type | Description | Example Use |
|---|---|---|
| String | Text values | order_id, product_name, search_query |
| Number | Numeric values | quantity, price, age |
| Boolean | True/false | is_urgent, wants_notification |
| Enum | Predefined options | order_status (pending/shipped/delivered) |
| Date | A calendar date (2026-09-25) | delivery_date, birth_date |
| Date & time | A date with a time, ISO with offset (2026-09-25T17:00:00+04:00) | pickup_slot, appointment_at |
| Object | Complex nested data | shipping_address with street, city, zip |
| Array | List of values | product_ids, selected_options |
Creating a Component
- Click on a component chip in the Referenced Variables section
- Or navigate to Components section and click "Add Component"
- Fill in:
- Name — snake_case identifier (e.g.,
order_id) - Description — Explain what this data represents (helps AI extract correctly)
- Type — Select appropriate type
- Validation (optional) — rules for the type: number range, text length or a Format regex with a plain-language Format hint, or a date window (allow past/future, earliest/latest days from today). The rule is shown to the AI as part of the parameter description and enforced when the tool runs — an argument that breaks it is rejected with the rule text before your API is ever called.
- Example Value — Sample data for documentation
- Name — snake_case identifier (e.g.,
Run the tool from the Test drawer with a value that breaks the rule — the response is Invalid argument(s) naming the field and its rule, exactly what the AI would be told.
Complete Example: Order Lookup Tool
Scenario: Create a tool that looks up order status from your e-commerce API.
Basic Information
- Title:
get_order_status - Description:
Retrieves order details including current status, shipping information, and estimated delivery date. Use when customer asks about their order status, tracking, or delivery.
API Configuration
- Base URL:
https://api.mystore.com - Method:
GET - Endpoint:
/v1/orders/{{order_id}}
Headers
| Header | Value |
|---|---|
Authorization | Bearer sk_live_xxxxxxxxxxxxx |
X-Customer-Email | {{$email}} |
Query Parameters
| Key | Value |
|---|---|
include | shipping,items |
JOLT Specification
[
  {
    "operation": "shift",
    "spec": {
      "order_number": "order_number",
      "status": "status",
      "created_at": "order_date",
      "shipping": {
        "carrier": "shipping_carrier",
        "tracking_number": "tracking_number",
        "estimated_delivery": "delivery_date"
      },
      "total": "total_amount"
    }
  }
]
Referenced Variables
order_id— Required (checked) — AI will ask customer for order number if not provided$email— Optional — used for verification
Assigning Tools to Agents
Creating a tool only saves it to your workspace — no agent can see or call it yet. If the agent "ignores" your new tool, the first thing to check is the assignment below.
After creating a tool, you need to assign it to an agent:
- Go to Agents
- Click on the agent you want to configure
- Go to the Tools tab
- Find your tool in the Available section
- Toggle the switch on to assign it
Your new tool will move to the Assigned section and the agent can start using it immediately.
If a tool is meant to run only inside a workflow, don't assign it to the agent — assign just the workflow. Workflow steps execute their tools server-side regardless of agent assignment, and keeping the raw tool unassigned means the agent can't accidentally call it half-way outside the flow.
See Agent Tools for more details.
Tips for Better Tool Usage
Write Descriptions with Expected Outcomes
Include what the tool returns in your description. This helps the AI understand when to use it:
Good description:
"Retrieves order details including order status, tracking number, shipping carrier, and estimated delivery date. Use when customer asks about their order status, tracking, or delivery."
Less helpful:
"Gets order information."
The AI now knows this tool returns tracking numbers, so it will use it when customers ask "Where's my tracking number?"
Managing Many Tools
If you have many tools, the AI might get confused about which one to use. Help it by updating your Agent Personality with Custom Instructions that explain when to use each tool:
Example Custom Instructions:
TOOL USAGE GUIDELINES:
- Use `get_order_status` when customer asks about order status, tracking, or delivery
- Use `check_inventory` when customer asks if a product is in stock
- Use `create_support_ticket` only when the issue cannot be resolved and needs human follow-up
- Always try `get_order_status` before `create_support_ticket` for order-related issues
This guidance in Custom Instructions helps the AI make better decisions about which tool to call.
What Happens to Unusual Responses
Two behaviours have no setting on the form, but you will meet them.
SOAP faults. If an XML service returns a fault, Orki converts it into a structured error and reports the call as failed, even when the fault arrived with a 200. JOLT is skipped — there is nothing meaningful to transform. The test drawer shows it as a red SOAP fault banner with the fault code.
Binary responses. If your API returns a PDF, an image or any other non-text content, Orki stores it and hands the agent a small JSON object instead:
{
  "file_url": "https://…",
  "content_type": "application/pdf",
  "size_bytes": 48213,
  "expires_in_seconds": 3600
}
The agent can then send that file to the customer. The link is valid for one hour. In the Test drawer the body is omitted with a note — binary content isn't rendered there.
Troubleshooting
| Issue | Solution |
|---|---|
| "Invalid component" error (red chip) | Create the component first, or check for typos in the name |
| "Base URL must be public domain" | Use your production API URL, not localhost or internal IPs |
| "Invalid JSON" in request body | Check for missing commas, unquoted keys, or trailing commas |
| API returns but AI gives wrong answer | Add JOLT spec to simplify/flatten the response |
| "Content-Type cannot be set" | Remove Content-Type from headers; it's auto-set based on body type |
| "Invalid XML" chip won't clear | The template isn't well-formed — check for an unclosed tag. Placeholders are ignored by the check |
| Generic server error on every call, but the URL is right | Usually a failing credential. Open the Test drawer — it names the real cause; the conversation never does |
| Call fails with a 413 | The response exceeded the size limit — trim it with JOLT, or return less |
| Call fails with a 429 before it even runs | You've hit the daily bandwidth limit for this customer or workspace |
| Duplicate orders/tickets after a slow API | Enable Verify on timeout in Advanced configuration |
Limits
The number of tools you can create depends on your plan — check Settings > Billing.
These platform limits apply to every call and surface as real errors:
| Limit | Value | What you see |
|---|---|---|
| Request body | 1 MB | The call is rejected |
| Response body | 5 MB | A 413 with the actual size |
| Bandwidth per customer | 100 MB / day | A 429 before the call runs |
| Bandwidth per workspace | 1 GB / day | A 429 before the call runs |
| Request timeout | 90 seconds | The call is reported as timed out |
This tool changes data
Every tool has one switch that decides whether the AI may use it while drafting a suggested reply for a human agent:
Tools that change data (create orders, update records, send anything to the customer) are excluded when the AI drafts reply suggestions for human agents. Turn this off only for purely read-only tools.
It is on by default — a tool is assumed to change data unless you say otherwise. When a human is handling a chat, the AI drafts its reply as a private dry run, so any tool with a real side effect (creating an order, updating a record, messaging the customer) is held back. Turn the switch off only for tools that purely read — a lookup, a status check, a search — so they stay available while the AI drafts. The setting has no effect while the AI is running the conversation normally; it only governs suggestion drafting. See Suggested Replies → What the AI can do while drafting.
Next Steps
- Agent Tools - Assign tools to your agents
- Authentication for API Tools - Store credentials once and attach them to any tool
- Authentication Reference - The exact contract, for the team that owns the API
- Personal Data Masking - Keep customer details away from the AI model
- AI Agents Overview - Configure agent behavior