Email Setup
Turn your support mailbox into an AI-answered channel. Customers keep writing to the address they already know, and your agent replies in the same email thread.
What Connecting Email Actually Means
Orki does not take over your mailbox. You keep your existing email provider, your existing address, and your existing MX records.
All you do is add a forwarding rule that sends a copy of incoming mail to an address Orki creates for you.
| Orki needs | Orki does NOT need |
|---|---|
| A forwarding rule to the address we give you | Your mailbox password |
| (Optional) A few DNS records, to reply from your own domain | IMAP or POP access |
| Any change to your MX records | |
| OAuth access to Google or Microsoft |
Accessing Email
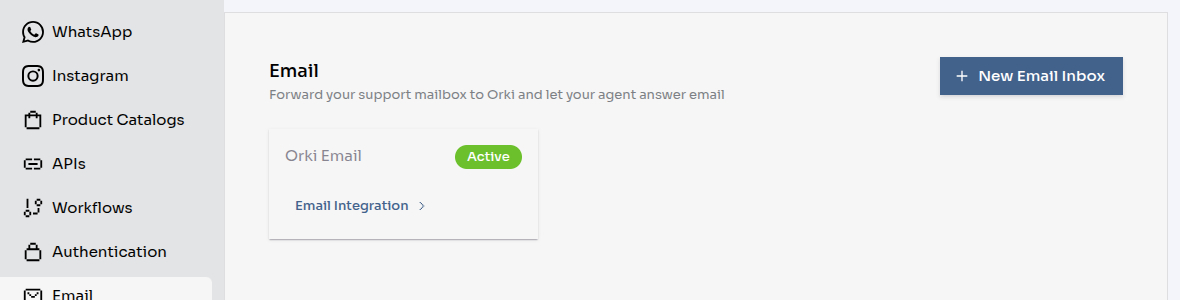
- Go to Integrations in the sidebar
- Click Email
- Click New Email Inbox (requires Admin or Super Admin permission)
Step 1: Create the Inbox
Creating an inbox asks you for nothing. Click the button and Orki immediately mints a unique address for you, then opens the inbox settings.
Your address looks like this:
You'll find it on the inbox page under Forwarding, in the read-only Your Orki address field, with a copy button next to it.
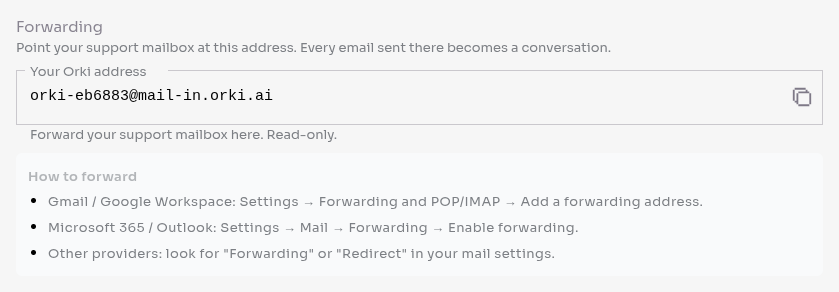
The suffix isn't decoration. If the address were simply [email protected], anyone could guess it and drop messages straight into your inbox. Treat the full address the way you'd treat a webhook URL — share it with your mail provider, not with the public.
Step 2: Forward Your Support Mailbox
Set up forwarding in whichever provider hosts your support mailbox:
- Gmail / Google Workspace — Settings → Forwarding and POP/IMAP → Add a forwarding address
- Microsoft 365 / Outlook — Settings → Mail → Forwarding → Enable forwarding
- Other providers — look for "Forwarding" or "Redirect" in your mail settings
Most providers send a confirmation code to the forwarding address before they activate the rule. That email lands in Orki as a normal conversation — open Chats, find it, and copy the code from there.
Gmail and Microsoft both let you choose between "forward and keep a copy" and "forward and delete". Keeping a copy is the safer choice while you're getting started — nothing depends on it, and it gives you a fallback view of what arrived.
Step 3: Choose the Default Agent
On the inbox page, pick which AI agent answers new email conversations from the Default agent dropdown. It saves as soon as you choose.
You can also select No default agent — mail still arrives and is stored, it just waits for a human.
Step 4: Set How Replies Look (Optional)
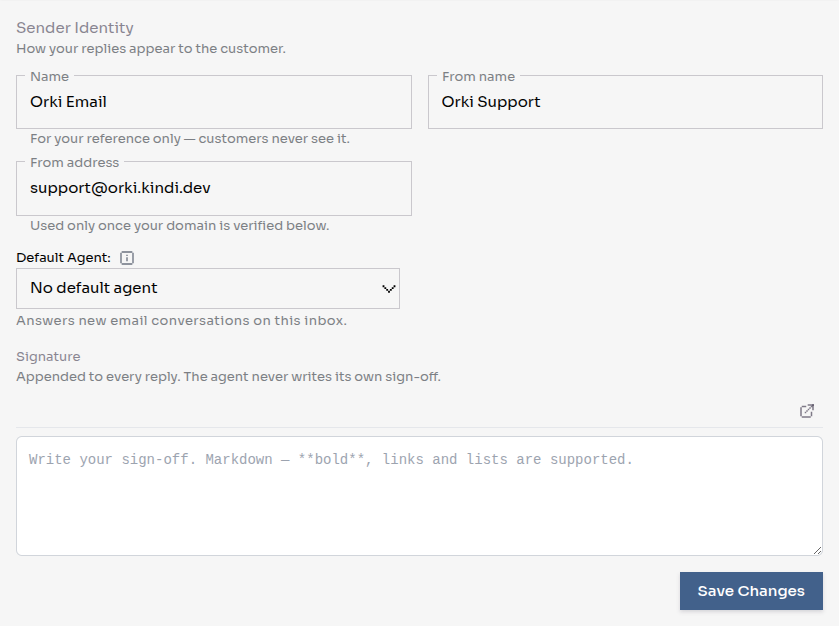
The Sender Identity section controls how your replies appear in the customer's inbox.
Name
An internal label for this inbox — "Support", "Billing", "EU Store". Customers never see it. It's what identifies the inbox in your Integrations list.
From name
The display name on outgoing mail, for example Acme Support. If you leave it blank, your company name is used.
From address
The address you want replies to come from, for example [email protected].
Leave it empty if you're happy for replies to come from your Orki address — that's a complete, working setup, and it's what most inboxes start on.
A From address only takes effect once you've verified the domain. Until then, replies still go out from your Orki address. See Step 5.
Signature
Your sign-off, appended automatically to every reply.
Write it in Markdown — **bold**, links and lists all work. Raw HTML is stripped for safety.
**Acme Support**
[acme.com](https://acme.com) · +968 1234 5678
Because Orki appends your signature, the agent is instructed not to add "Best regards, …" of its own. You get one consistent sign-off across every reply instead of whatever the AI invents that day.
Step 5: Send From Your Own Domain (Optional)
This step is genuinely optional. Your inbox works end to end without it — read the next section before deciding you need it.
If You Don't Want to Use Your Own Domain
Leave From address empty and you're done. Nothing to publish, no DNS, no waiting.
Replies go out from a shared Orki address built from your own inbox:
From:      Acme Support <[email protected]>
Reply-To:  acme-7f3a2b+…@mail-in.orki.ai
| Your brand still shows | The customer's inbox lists the sender as "Acme Support" — your From name, not ours. Only the address behind it is Orki's. |
| It's already authenticated | Orki's domain is DKIM-signed, so your replies pass the same checks a verified domain would. They don't land in spam for being unsigned. |
| Replies still reach you | The Reply-To header carries your inbox's routing tag, so a reply lands back in the same conversation. |
The address is unique to your inbox — that's what keeps your replies routable and your sending reputation separate from every other Orki customer.
@orki.ai and @mail.orki.ai are Orki's own domains, so they can't be entered as a From address — the app refuses them and points you back here. The shared address you're given is assigned automatically.
Why Verify, Then?
One reason: customers see [email protected] instead of an Orki address. If that matters to your brand, publish the records below. If it doesn't, skip to Step 6.
Modern mail providers check that an email claiming to come from acme.com was actually signed by whoever controls acme.com. Sending on your behalf before that's set up would land your replies in spam — and hurt your domain's reputation while it happens. The DNS records below are what make signing possible.
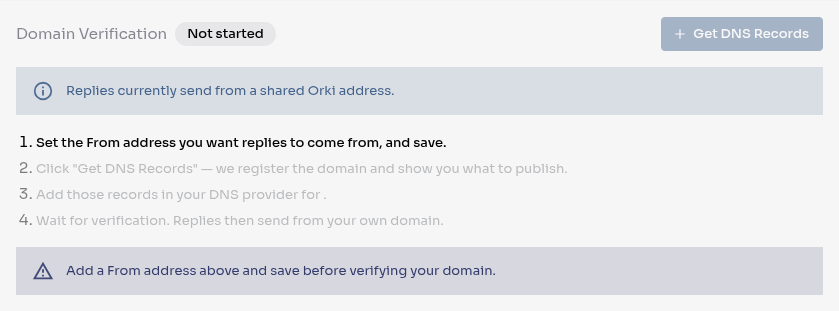
1. Set your From address and save
The Get DNS Records button stays disabled until a From address is saved on the inbox. The step list on the page shows where you are.
2. Get your records
Click Get DNS Records. Orki registers the domain and shows you exactly what to publish.
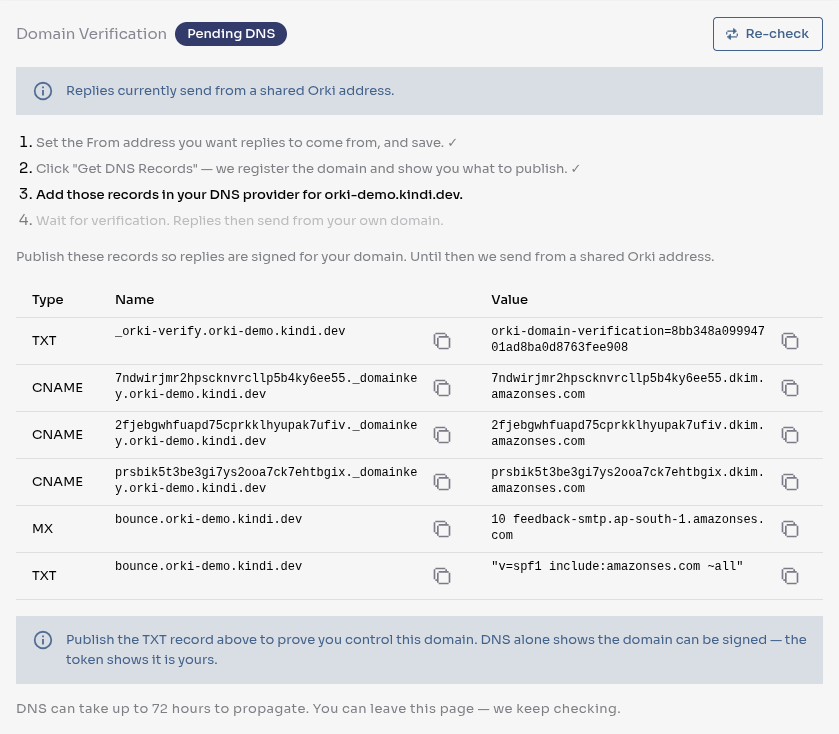
For a From address of [email protected] you'll get six records:
| Type | Name | Value |
|---|---|---|
| TXT | _orki-verify.acme.com | orki-domain-verification=<your token> |
| CNAME | <token1>._domainkey.acme.com | <token1>.dkim.amazonses.com |
| CNAME | <token2>._domainkey.acme.com | <token2>.dkim.amazonses.com |
| CNAME | <token3>._domainkey.acme.com | <token3>.dkim.amazonses.com |
| MX | bounce.acme.com | 10 feedback-smtp.ap-south-1.amazonses.com |
| TXT | bounce.acme.com | "v=spf1 include:amazonses.com ~all" |
Copy the exact values from the app — every Name and Value cell has its own copy button. What each group does:
| Records | Purpose |
|---|---|
| The three CNAME records | DKIM signing keys. They let mail providers confirm a reply really came from your domain. |
| The TXT verification record | Proves the domain is yours. Signing keys alone show the domain can be signed — they don't show who asked. |
The MX and SPF records on bounce. | Route bounces and complaints to your own subdomain instead of a generic one, which improves deliverability. |
3. Publish them in your DNS provider
Add each record in whichever service hosts your DNS — Cloudflare, GoDaddy, Route 53, your registrar.
Many DNS panels append your domain automatically. If the Name field already shows .acme.com beneath it, enter _orki-verify — not _orki-verify.acme.com. Doubling it produces _orki-verify.acme.com.acme.com, which never resolves. This is by far the most common reason verification fails.
4. Wait
DNS changes can take up to 72 hours to propagate, though most providers are much faster. Orki re-checks every 30 seconds while you have the page open, and keeps checking after you leave — there's nothing to click again.
Verification Statuses
| Status | What it means |
|---|---|
| Not started | The domain hasn't been registered yet. Click Get DNS Records. |
| Pending DNS | Records issued, waiting for them to appear. Also shown when signing has verified but the ownership TXT record hasn't been found yet. |
| Verified | Done. Replies now go out from your own address. |
| Failed | Verification didn't succeed. Check every record matches exactly, then click Re-check. |
| Temporary failure | A transient problem on the provider side. Try Re-check later. |
The banner at the top of the section always tells you which address is really in use, so you never have to guess.
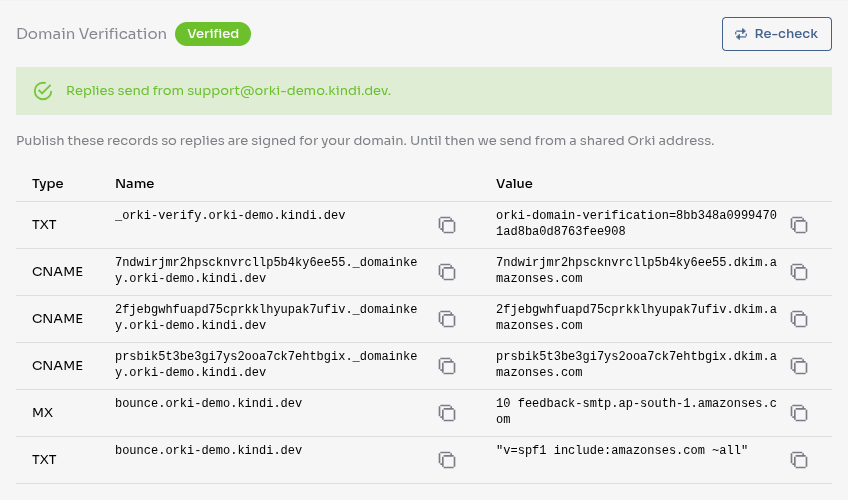
Once the chip reads Verified, replies switch to your own address immediately — there's nothing else to press.
A domain can sit on Pending DNS even after your CNAME records resolve. That's the ownership TXT record still missing. Both have to pass before Orki will send as your domain.
Changing Your From Address Later
Switching to an address on a different domain resets verification — the new domain needs its own records. Changing the local part only (support@ → help@) on an already-verified domain changes nothing.
orki.ai and its subdomains are platform domains — see above. Leave the field empty to send from the shared address.
Step 6: Draft Instead of Send (Optional)
The Behaviour section has two switches. Both save the moment you flip them.

Let the AI reply automatically
On (default) — the agent answers incoming email by itself.
Off — nothing is sent automatically. The email is still received and stored, the conversation lands in Needs Attention, and a suggested reply is drafted for whoever picks it up. A teammate reviews it and sends.
This is the setting to use while you're building confidence in the agent, or on an inbox where every reply needs a human eye.
Active
Off means email sent to this address is ignored. Use it to pause an inbox without deleting it — your forwarding rule can stay in place.
Managing Your Inbox
Each inbox appears as a card on the Integrations > Email page, showing its name, an Active or Inactive chip, and the assigned default agent. Click Email Integration on the card to open its settings.
Deleting an Inbox
Click Delete at the top of the inbox page.
Mail sent to that address stops being received. Existing conversations are kept — deleting an inbox never removes chat history.
Remember to remove the forwarding rule in your mail provider afterwards. Otherwise it keeps forwarding to an address that no longer accepts mail, and your provider may start reporting delivery failures.
Integration Limits
Email inboxes share the same Integrations allowance as WhatsApp, Instagram, Web Chat and API tools. Check your limit in Settings > Billing.
Next Steps
- Email Features - What email supports, and what it doesn't
- Chats - See incoming email conversations
- AI Agents - Configure your agent's behavior
- Handover Settings - Set up human escalation rules